Boot modes
boot modes
Besides the normal "retail" bootmode there are several other modes the console can boot or halt in:
Fan test
The "fan test" mode allows to clean out the dust inside the PS3. When the PS3 boots in this mode the fan starts spinning in opposite direction and at 100% speed for a few time. Is reported to work for PS3 Models CECHG and newer, as shown in this table
- How to enable fan test mode
- Turn power switch to the OFF position (at the back of PS3 Fat), or disconnect the main power cable (at the back of PS3 Slim and SuperSlim)
- Press and hold
 button in the Switch board
 - Turn power switch to the ON position (at the back of PS3 Fat), or connect the main power cable (at the back of PS3 Slim and SuperSlim)
Other special modes
The following requires the power switch in the back to be on:
- Hold
 button down for 6 seconds (while PS3 is on): turns off PS3.
 - Hold
 button down for one beep1 (while PS3 is off): Reset video to lowest settings.
 - Hold
 button down for two beeps (while PS3 is off): Enter PS3 diagnostic mode (repeat procedure twice)
- Hold
 button down for 6 seconds (while PS3 is on): force disc to eject.
 - Hold
 button down for 12 seconds (while PS3 is on): reset Blu-ray.
1: beeps means beeps within a sort succession and exclude all previous ones and the power-on beep
JIG / Factory Service Mode / manufacturer
- The PS3 can enter a special "Service Mode". When it does (and can boot harddrive/dev_flash) the bottom right hand corner of the screen has a red translucent rectangle with the words "Playstation 3. Factory/Service Mode" inside of the rectangle. When the PS3 is off, plugging a special "JIG" in the USB port (and then pressing Eject immediately after pressing the Power button), the PS3 is triggered into Service Mode when it boots up. This special mode then accepts firmware code loaded in from the USB port (PS3UPDAT.PUP), and allows reflashing the firmware chip, or running programs from a USB drive.
- When on Factory Service Mode you cannot access the browser or leave the mode without an exit self and the console needs to be compatible with the exit self
See also: Downgrading with PSgrade Dongle and Remarry Bluray Drive which uses this mode.
LED Diag Mode
I have found what I think is a diag mode that displays error codes using the power button light, kind of like what an OBD-1 ECU on a car would do. To activate it you have to do a fan test and wait until after the ps3 powers off(this much I am sure of) then you have to press eject and then power rapidly many times in succession also try holding eject and pressing power. Once you enter this mode the power light will flash yellow for about 1 second then the status of 4 component's(which ones I don't know) within the ps3 will be displayed by the power light blinking 4 times for each 4 component's. Then the yellow light blinks again letting you know the cycle has started again.
- On my bricked slim (CECH-2501B) the first sequence of 4 is: green red green red.
- On my working slim (CECH-2101B) the first sequence is: red red red red.
- On my other working slim (CECH-3001A) the first sequence is: red red red red.
- On all three consoles the next 3 sequence's, are all red.
So it seems that red=good and green=bad. Also I removed the Blu-ray drive on my bricked slim and the codes did not change. sorry I don't know more about this.
Update: 7-27-2012
I have now bricked the CECH-2101B and it also displays green red green red as the first sequence of 4
Anyone with a ylod console please post their symptoms and result of this test
Probably Green = 1, while red = 0. So you get 16 bits.
Blu-ray drive is not a core part of the system, it will boot without it just fine.
Cannot seem to get led diag to work on CECHA fats, don't know what FW version (because requiring fan test , available only for Models CECHG and higher?).
Update:
LED Diag mode only works on the 21xx, 25xx, and 30xx models, in order to access this mode on those models, you need to enter the fan test mode by having the console unplugged, hold the eject button and while holding it, plug the console back in, this will start the fan test. Once the Fan test has ended, you will need to press the power button 3 times, then the eject button three times, then the power button twice, this will make the console enter LED Diag Mode. The sequence will start with a yellow light and then display a green or red light in a sequence of 4, green means 0 and red means 1.
For example if you have Green Green Red Green, this will give 0010, then the second sequence is Green Green Green Green will give 0000, then the third sequence is Green Green Red Green which is also 0010, then the fourth sequence is Green Red Green Green, this will give 0100, then it will display a yellow light again and the sequence will repeat. This is giving the last error code syscon had if it got the YLOD/NoLOD. This is being given in binary, so if you convert those numbers to Hexadecimal you will get 2024. Now for the letters it will also be in hexadecimal, for example F will be Red Red Red Red or 1111 and B will be Red Green Red Red or 1011. So if you get a sequence and it doesn’t convert to a single digit number from binary, then try converting it from hexadecimal to decimal and it should work.
On Board Diagnostics: http://en.wikipedia.org/wiki/On-board_diagnostics
Errors on boot
crossreference: Boot Order::References + Components
Error output in order of appearance and likely suspects:
NoLOD
NoLOD - No Led of Death
- Failure in the hardware_init stage. Suspects: Power disconnected, switch off, Power Supply, 12V fuses
- Misc: Faulty Ribbon Cable
- The PS3 models with the model numbers 25xx onwards do not show a typical YLOD, they instead will turn on and once an error occurs, it turns right back off, and then will report said error to syscon. This is also known as the NoLOD.
Solid Red
Solid Red - Powered Standby mode
Solid Green
Solid Green - Powered On.
Solid Blue
Solid Blue - Disc present in Bluray Drive
Flashing Blue
Flashing Blue - Disc inserted in / being ejected from Bluray Drive
YLOD
YLOD - Yellow Led of Death (Flashes Green, Yellow then Red)
- Failure in the hardware_init stage. Suspects: RSX, CELL BE, XDR Ram, GDDR Vram, Syscon, South Bridge , Starship2 (if NAND SKU), NAND/NOR Flash, Power Supply, Fuses, Regulators, Cooling/Fan
- Only occurs on the A Models to the 20xx model slims (the 21xx doesn’t show a yellow light but has the same sequence).
If you ground out tristate on a (?NOR only?) console with YLOD, it would GLOD instead if it is caused by bad flash (or content of flash). This makes it an easy way to check if the YLOD is flash caused (most common) or RSX caused (second most common).
RLOD
RLOD - Flashing Red Led of Death
- Failure in the loaders stage. Suspects: Flash content: CoreOS files, inproper lv0ldr - pre VSH.
- For 21xx slim models during the YLOD sequence, the LED does not turn yellow but the rest of the sequence is normal, this is also sometimes called RLOD.
Seen in combination with poweroff when downgrading below metldr/bootldr capability
GLOD
GLOD - Flashing Green Led of Death (or when nothing is bad: PS3 is powering off)
RSOD
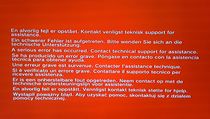
Red Screen Of Death error msg "serious error has occurred"
- Failure at the firmware stage. Suspects: Harddrive content: Firmware files on UFS2 partition.
Seen with cvtrm errors : RSOD Fix
BSOD
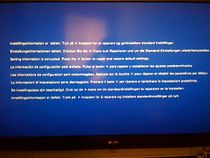
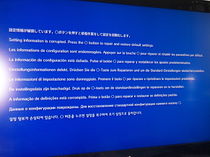
Blue Screen of Death] error msg "Settings information is corrupted. Press the X button to repair and restore default settings."
- Failure at the configuration stage. Suspects: Harddrive/NAND VFlash areas content: Registry files on FAT16 partition (/dev_flash2 on NAND), VSH files on UFS2 partition (/dev_flash on NAND).
Examples:
- Registry bad : Easy fixable by following instructions or using Recovery
- Dev_flash files integrity fail : Seen when using Spoofed index.dat/version.txt without patching VSH.self too (e.g. RogeroV3 -> solved in RogeroV3.1)
- also seen with VSH panic related to CEX2DEX/TargetID mismatches
- Bad mounting of dev_flash : Seen when mounting improper R/W on USB ala mount alejandro
- Broken/dying NAND Flash : Caused by aging, power interuption.
- Broken/dying harddrive : Caused by aging, bad head/platter reads. Check with other drive.
- Broken/dying Gigabit LAN IC : Caused by shorting MDI pins. Network not working wired.
If there is no hardware failure, reinstalling a proper firmware in Recovery Menu would likely fix it, some times requiring resetting/revalidating using the Recovery Menu suboptions.
XMB error msg
XMB error msg
- RSOE (red screen of error) - looks alot like RSOD, but with only 1 language and an errorcode)
- Failure after initial firmware stage. Suspects: Harddrive content: User specific files/settings in UFS2 partition.


