IHS removal: Difference between revisions
m (→Tools) |
No edit summary |
||
| (3 intermediate revisions by 3 users not shown) | |||
| Line 1: | Line 1: | ||
{{Wikify}} | {{Wikify}} | ||
The IHS for the RSX on every model between the CECHA/B, to the final slim model 30XX is attached using thermal adhesive/glue on the 4 ram chips. On all super slim models 40XX-43XX the RSX is cooled using direct die cooling with a heatpipe that sits directly on the RSX die with no contact being made to the ram chips. | |||
Removal of the CELL is slightly more tricky as it involves cutting the silicone sealant that surrounds the chip without scratching or ripping any of the traces on the top of the chip. This process is further complicated by the fact that after the 25XX revision Sony began to use solder to also secure the IHS and later thermal adhesive to secure others. The only way of determining what is underneath the IHS of the later CELL models is by cutting the adhesive and seeing if the IHS comes free with little to no force. <br /> | |||
<span style="background:red; color:#ffffff;">WARNING! If you have cleanly cut the silicone around the IHS and it did not come off without any force you have a solder/adhesive model. Continuing to force the IHS off will likely result in the CELL die cracking and the console becoming a permanent brick.</span> | |||
=Tutorials= | =Tutorials= | ||
http://flake.tweakblogs.net/blog/10754/mythbusting-the-truth-about-playstation-3-cooling | http://flake.tweakblogs.net/blog/10754/mythbusting-the-truth-about-playstation-3-cooling | ||
| Line 9: | Line 11: | ||
<Gallery> | <Gallery> | ||
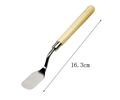
File:Dental spatula.jpg|Dental spatula | File:Dental spatula.jpg|Dental spatula | ||
File:Oil paint | File:Oil paint spatula.jpg|Oil paint spatula | ||
File:Feeler gauge set.jpg|Feeler gauge set | File:Feeler gauge set.jpg|Feeler gauge set | ||
</Gallery> | </Gallery> | ||
Latest revision as of 05:36, 19 October 2019
| This article is marked for rewrite/restructuring in proper wiki format. You can help PS3 Developer wiki by editing it. |
The IHS for the RSX on every model between the CECHA/B, to the final slim model 30XX is attached using thermal adhesive/glue on the 4 ram chips. On all super slim models 40XX-43XX the RSX is cooled using direct die cooling with a heatpipe that sits directly on the RSX die with no contact being made to the ram chips.
Removal of the CELL is slightly more tricky as it involves cutting the silicone sealant that surrounds the chip without scratching or ripping any of the traces on the top of the chip. This process is further complicated by the fact that after the 25XX revision Sony began to use solder to also secure the IHS and later thermal adhesive to secure others. The only way of determining what is underneath the IHS of the later CELL models is by cutting the adhesive and seeing if the IHS comes free with little to no force.
WARNING! If you have cleanly cut the silicone around the IHS and it did not come off without any force you have a solder/adhesive model. Continuing to force the IHS off will likely result in the CELL die cracking and the console becoming a permanent brick.
Tutorials[edit | edit source]
http://flake.tweakblogs.net/blog/10754/mythbusting-the-truth-about-playstation-3-cooling
Tools[edit | edit source]
| ||||||||||||||||||||||


