JAISPI
| This article is marked for rewrite/restructuring in proper wiki format. You can help PS4 Developer wiki by editing it. |
Someone should translate the spanish resources into english for wiki here, please.
JAISPI
JAISPI - Raspberry Pi SPI flasher for PS4
Source:
JAISPI - Utility to read and write to the main memory (MX25L25635FMI-10G) of PS4 with the Raspberry Pi through the SPI protocol.
Changelog
- v1.0
- Support MX25L25635FMI-10G
- Reading
- Programming
- Full Erase
Options
 -i /dev/spidevX.X             Get ID from flash
 -e /dev/spidevX.X             Erase entire flash
 -r file.bin /dev/spidevX.X    Read entire flash to file
 -p file.bin /dev/spidevX.X    Only write blocks differences from file
 -v file.bin /dev/spidevX.X    Verify blocks with file
Get ID
-i: Displays information of the flash.
#jaispi -i /dev/spidev0.0
JaiSpi v1.0
ID:  0xC22019 MX25L25635
Erase
-e: Clears all flash (Average time: 1min, 30sec)
#jaispi -e /dev/spidev0.0
JaiSpi v1.0
ID:  0xC22019 MX25L25635
Erasing blocks...
Done!
Read
-r: Makes a full dump of the flash (Average time: 35sec)
#jaispi -r DUMP.bin /dev/spidev0.0
JaiSpi v1.0
ID:  0xC22019 MX25L25635
Reading...
0x02000000
Done!
Program
-p: Write to flash only the changed sectors (Average time: 1min 30sec)
#jaispi -p Base.bin /dev/spidev0.0
JaiSpi v1.0
ID:  0xC22019 MX25L25635
Starting...
0x02000000 -> 8192 Sectors written
Done!
Verify
-v: Verify the contents of the flash with the filename (Average time: 35sec)
#jaispi -v Base.bin /dev/spidev0.0
JaiSpi v1.0
ID:  0xC22019 MX25L25635
Checking...
0x02000000 -> 0 Different sectors
Done!
Installation Instructions
Materials Required
- 1x RaspberryPi (raspberrypi.org)
- 1x SD Memory
- 1x Integrated MX25L25635FMI-10G (Main Memory PS4)
Downloads
- Raspbian (http://downloads.raspberrypi.org/raspbian_latest)
- Win32 Disk Imager (http://sourceforge.net/projects/win32diskimager/files/latest/download)
- Putty (http://the.earth.li/~sgtatham/putty/latest/x86/putty.exe)
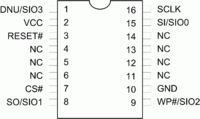
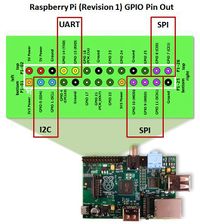
Pinout
| 8-Pin | 16-pin | Usage | Raspberry Pi JAISPI |
Description |
|---|---|---|---|---|
| - | 1 | SIO3 | NC | 8pin: Not Available - not used / 16pin: Serial Data Input & Output (for 4xI/O read mode) |
| 8 | 2 | VCC | 17 | +3V DC Power Supply |
| 7 | 3 | HOLD#/RESET# | NC | 8pin: Hold, to pause the device without deselecting the device / 16pin: Hardware Reset Pin Active low |
| - | 4 | NC | NC | No Connection |
| - | 5 | NC | NC | No Connection |
| - | 6 | NC | NC | No Connection |
| 1 | 7 | CS# | 24 | Chip Select |
| 2 | 8 | SO/SIO1 | 21 | Serial Data Output (for 1 x I/O) or Serial Data Input & Output (for 2x I/O or 4x I/O read mode) |
| 3 | 9 | WP#/SIO2 | 25 | Write Protection: connect to GND or Serial Data Input & Output (for 4x I/O read mode) |
| 4 | 10 | GND | 25 | Ground |
| - | 11 | NC | NC | No Connection |
| - | 12 | NC | NC | No Connection |
| - | 13 | NC | NC | No Connection |
| - | 14 | NC | NC | No Connection |
| 5 | 15 | SI/SIO0 | 19 | Serial Data Input (for 1 x I/O) or Serial Data Input & Output (for 2x I/O or 4x I/O read mode) |
| 6 | 16 | SCLK | 23 | Clock Input |
Use short wires, esp. if you are not adding the 0.1µF capacitor between ground and vcc as close as possible to the chip
Installation
Run win32diskimage.
File-In image select the image downloaded and decompressed Raspbian.
- In Device select the drive where the SD memory is.
We Power-Write.
We insert the SD in Raspberry and fed by the USB cable. After two minutes, run Putty.
-In Host Name put: raspberrypi
-De not work well the previous step, go to the router and find the IP assigned to your RaspberryPi.
-We marked SSH.
-We Power Open.
We request Login. According Raspbian the user is "pi" and the password "raspberry" (Both without quotes).
We insert the following commands:
sudo-s
cd /bin
wget http://jaicrab.org/Ps4/Tools/JAISPI/jaispi
chmod +x jaispi
echo "# blacklist spi-bcm2708"> / etc / modprobe.d / blacklist.conf raspi-
echo "blacklist i2c-bcm2708" >> / etc / modprobe.d / blacklist.conf raspi-
reboot
Installation is complete. By Putty you can access the RaspberryPi. To run the command jaispi need to be root (sudo-s):
| |||||||||||||||||||||||||||||||


