Hidden Modes
Basic Usage
While the PSVita is on (in Running Mode):
- Press and quickly release the Power Button: Put PSVita into Standby mode.
- Press and hold the Power Button for three seconds and release: Turn off the PSVita (swipe to power off).
- Press and hold the PS Button for two seconds and release: A panel pops up (flight mode) allowing you to disable all of the system's network features (Wi-Fi, mobile network, and Bluetooth features), change brightness, music volume, disable mic, and audio chat settings.
- Press and hold the Power Button for 10 seconds and release: Force the PSVita to power off immediately.
- Press PS Button and Start Button together and quickly release: Take a picture of the current PSVita screen and place in Photos collection.
While the PSvita is on (in Standby Mode):
- Press and quickly release the Power Button or PS Button: Put PSVita into Running mode.
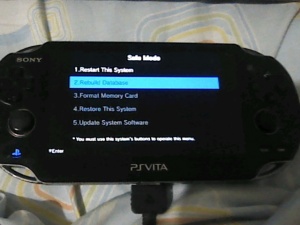
Safe Mode
- Vita enters safe mode when theres a serious software error
- Required action to get the vita working is always the one that is not grayed out.
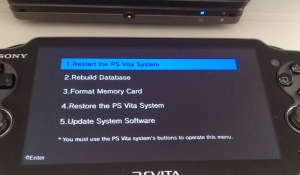
Safe Mode Options
1. Restart the PS Vita System
This option boots your system as normal without changing any settings or files.
2. Rebuild Database
This can be a useful feature if you have lost files on your system for no apparent reason. Try using this feature to see if it can restore those files. This will also rewrite corrupted files within the database, potentially eliminating future issues. This feature should not erase any of your saved data or settings.
Deletes messages, playlists, changes made on "Information" screens, trimming information for pictures in "Photo", video thumbnails, video playback history and video resume information.
This operation may take a long time depending on the type and number of data items.
3. Format Memory Card (grayed out)
4. Restore the PS Vita System (grayed out)
5. Update System Software (grayed out)
Recovery Menu
- Turn OFF your PS Vita (Press Power Button for 10 seconds)
- Now press and hold "R" + Power + PS (PlayStation Button)
- Wait...
- Now you're in Recovery Menu (Mode)
See also: http://www.youtube.com/watch?v=R532NpDMQhw Since 1.51 it seems alot easier to enter recovery menu: http://www.youtube.com/watch?v=ublLC235QV0
Recovery Menu Options
1. Restart the PS Vita System
This option boots your system as normal without changing any settings or files.
2. Rebuild Database
This can be a usefull feature if you have lost files on your system for no apparent reason. Try using this feature to see if it can restore those files. This will also rewrite corrupted files within the database, potentially eliminating future issues. This feature should not erase any of your saved data or settings.
Deletes messages, playlists, changes made on "Information" screens, trimming information for pictures in "Photo", video thumbnails, video playback history and video resume information.
This operation may take a long time depending on the type and number of data items.
3. Format Memory Card
This will format the memory card, effectively erasing all data currently on it.
4. Restore the PS Vita System
This will restore your system to original including, formatting and erasing all of the data on internal flash and returning all system settings to default. This will not take your system back to a previous Firmware release. Use this option as a last resort, unless you have nothing on the console that you want or you want to erase everything on the console, do not use this option.
5. Update System Software
This can usefull if your system has become corrupted to the point you can not boot. This will allow the user to update their console with new firmware via :
- PS3
- PC
- PS Vita memorycard (ux0:data/PSP2/UPDATE/PSP2UPDAT.PUP)
SceCompat Diagnostic
It will show some dolphins and a seashell. In this mode you can test the spotlight performance on the PS Vita.
this is only included in a special factory "reset image" version of the system software,
this version has a completely empty vs0: and as such will never boot into the main shell.
This is emulated via the PSP Compatibiltiy Layer "SceCompat" and is loaded by the module compat_diag.skprx.
will load the dolphin program "simple.prx" of the memory of the PSP emulator, and start it.
the entire EMMC of a dolphin vita was dumped using SD boot in 2023. and can be found on archive.org
but the compat_diag.skprx module can also be found in os0-inactive partition on early vita's that have never had a system update.
| Name Function | Commands | Description |
|---|---|---|
| Direction | [on / off] | Enable/Disable the three upper bulbs |
| Point | [on / off] | Enable/Disable the single bulb near the seashell |
| Spot | [on / off] | Enable/Disable the reflector |
| - | [Spline Model / Polygon Model] | Switch the Model type |
| HCNT | [420 / 132] | This value will change when you will switch the Model type |
| Button | You need to Hold it? | What Does | Description |
|---|---|---|---|
| O | no | Change Values | |
| /\ | no | Change Function | |
| L | yes | Zoom- | it will zoom out on the seashell's pearl |
| R | yes | Zoom+ | it will zoom in on the seashell's pearl |
| Select | yes | Enable a new menu, but froze the old one | Three text appears: the main two are OK NG (you can choose one of these with the arrows) and the third one a memory address (0x00000000) probably from the HCNT. |
| Arrows | no | These will works only in the Select menu. |
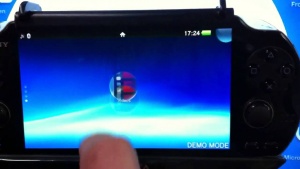
Demo Mode
[Available only via an external software (IDU) Cartridge]
It will show 'DEMO MODE' in the bottom right corner of the PS Vita, and said demo mode will hide most pre-installed applications.
To enable this mode: An external PS Vita (IDU) Cartridge is necessary to add the demo mode to a retail model.
To (temporary) disable this mode: Hold L + R + UP + START (for a few seconds)
Not much is known about the demo mode (aka. Kiosk firmware) of the PS Vita. It is just known, that temporary disabling it with restart the PS Vita on its own after 5 minutes, if the device is not running any kind of software (e.g. a game) and if it is not connected to an external power charger.
Updating/Downgrading the PS Vita will not remove the demo mode, the device remains a kiosk device, unless one removes the demo mode with the IDU cartridge which installed it in the first place.
Show Mode
Only avalible on DEX (TestKit or Retail with modified shell.self)
Show mode is exactly the same as normal mode only the Power and PS Buttons have been disabled
there not really disabled, if you hold down the PS Button you can still exit out of an app and if you hold down the Power button you can force power off the device
to enable/disable showmode, any time on the livearea screen press and hold
L + R + RIGHT + START + POWER
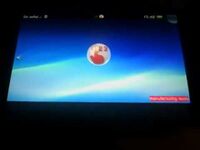
Manufacturing Mode
Currently Known Differences To Retail.
1. Manufacturing mode will not run retail games, however this can be bypassed by installing Henkaku.
2. Disabling/Enabling Manufacturing mode is Only via F00D usually with a JIG
3. At Bootup Manufacturing mode will auto-run a self located @ ux0:psp2diag.self or sd0:psp2diag.self
4. Manufacturing mode FileSystem is the same as retail,
5. Manufacturing mode places a watermark in the bottom corner. See Below:
More System Information
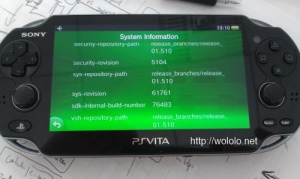
This menu contains information about the system build, repository, revision, etc. The combination to get this menu to show requires practice.
On PS Vita
See also Original information by Princess of Sleeping, Original information by Nabnab.
Old combo
The old combo works on firmware 1.510 and lower. It does not work on FW 1.810.011 and above.
- Go to Settings > System > System Information
- Press simultaneously RTrigger + LTrigger + DPad Left + Square for a few seconds
- Release those buttons then immediately press the start button
New combo
The new combo works on firmware 1.810.011 and above. It does not work on FW 1.510 and below.
- Push Left Analog Stick Up
- Hold Left Analog Stick Down
- Hold R trigger
- Press Digital Pad Up button
- Release Left Analog Stick Down
- Wait 5 seconds
- Release R trigger
- Press Start and Select
Sample
All the information come from index.dat.
| Description | Parameter | Example | Notes |
|---|---|---|---|
| release | 0x[FW_VERSION] | 0x01510021 | - |
| Build | [CEX/DEX/TOOL/...] | CEX | - |
| security-repository-path | release_branches/release_[FW_VERSION] | release_branches/release_01.510 | - |
| security-revision | [Revision ID] | 5104 | - |
| sys-repository-path | release_branches/release_[FW_VERSION] | release_branches/release_01.510 | - |
| sys-revision | [Revision ID] | 61761 | - |
| sdk-internal-build-number | [SDK Revision ID] | 76483 | - |
| vsh-repository-path | release_branches/release_[FW_VERSION] | release_branches/release_01.510 | - |
| vsh-revision | [Revision ID] | 83588 | - |
| vsh-build-number | [Revision ID] | 399369 | - |
| Product Code | [CEX/DEX/TOOL/...]_[J1/E12/...] | CEX_E12 | - |
| Settings format Version | [FW] | 001.500.61 | - |
Another sample:
   release: 0x01520011
   build: CEX
   security-repository-path: release_branches/release_01.520
   security-revision: 5135
   sys-repository-path: release_branches/release_01.520
   sys-revision: 62515
   sdk-internal-build-number: 77206
   vsh-repository-path: release_branches/release_01.520
   vsh-revision: 84399
   vsh-build-number: 405413
   Product Code: CEX_E12
   Settings format Version:001.500.61
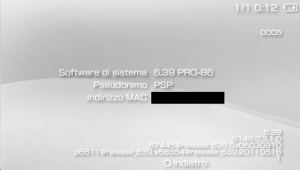
On PSP
This "menu" is available also on the PSP. this is an example.
All the information come from flash0/vsh/etc/version.txt.
- release:6.39:
- build:5148,0,3,1,0:builder@vsh-build6
- system:57445@release_639,0x06030910:
- vsh:p6611@release_639,v58354@release_639,20110518:
- target:1:WorldWide
