Dual Firmware: Difference between revisions
mNo edit summary |
|||
| (2 intermediate revisions by the same user not shown) | |||
| Line 126: | Line 126: | ||
==== TSOP sockets ==== | ==== TSOP sockets ==== | ||
* http://www.primedistributing.com/ | * http://www.primedistributing.com/Enplas_OTS_Series_PDC_p/ots-series-pdc.htm | ||
* https://www.emulation.com/cgi-cfm/insert_quantity.cfm?part_number=S-TSO-SM-048-A%2C%2048-TSO1 | * https://www.emulation.com/cgi-cfm/insert_quantity.cfm?part_number=S-TSO-SM-048-A%2C%2048-TSO1 | ||
* https://www.emulation.com/cgi-cfm/insert_quantity.cfm?part_number=S-TSO-SM-048-A1%2C | * https://www.emulation.com/cgi-cfm/insert_quantity.cfm?part_number=S-TSO-SM-048-A1%2C | ||
| Line 139: | Line 139: | ||
==== TSOP sockets ==== | ==== TSOP sockets ==== | ||
* http://www.primedistributing.com/ | * http://www.primedistributing.com/Enplas_OTS_Series_PDC_p/ots-series-pdc.htm | ||
== Solutions for swapping / externalise the harddrive == | == Solutions for swapping / externalise the harddrive == | ||
| Line 162: | Line 162: | ||
Alot of the above mentioned solutions can be made DIY. | Alot of the above mentioned solutions can be made DIY. | ||
* http://www.aliexpress.com/fm-store/601043/210118527-417040433/SATA-7-pin-Male-to-ESATA-Female-cable-30cm-for-ps3.html (only US $5.99 !) | * http://www.aliexpress.com/fm-store/601043/210118527-417040433/SATA-7-pin-Male-to-ESATA-Female-cable-30cm-for-ps3.html (only US $5.99 !) | ||
* http://www.amazon. | * http://www.amazon.com/eSATA-Female-Extension-Cable-Bracket/dp/B00IU8Y9AG | ||
* http://maxict.nl/product/3507535/delock-82855-cable-sata-extension-serial-ata-verl-ngerungskabel-serial-ata-150-300-600-serial-ata-7-polig | |||
=== SATA Switches === | === SATA Switches === | ||
Revision as of 09:59, 2 February 2015
Hardware Based
NOR/Nand Piggybacking
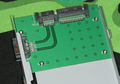
This method involves physically soldering another flash chip ontop of the existing flash packages, soldering the legs pin for pin (piggybacking). You will lift both #CE pins and provide a switch between them to select the appropriate flash chip, of which each will have a different firmware.
E.g.: http://www.elotrolado.net/hilo_la-dual-nand-fat40g-ya-es-una-realidad_1650176 / http://www.ps3hax.net/2011/07/dual-ps3-nand-on-40gb-phat-ps3-working/
other example (non PS3) : http://electro-music.com/forum/post-85678.html#85678
Reset pin for NOR
After looking into this some more, Simply switching the #CE pin may not be sufficient as the chip is still operating and can interfere with the bus. However, it appears that whilst the #reset pin is tied low, all input/output pins on the flash are in a state of high-impedance. We should be able to simply ground this pin to disable that chip, rather than lifting the #CE pin.
EDIT: it seems it is sufficient to use only CE# as several tests (some on this very same page) prove.
more than 2 (virtually limitless)
Theoretical there is no limit to the amount of flashchips you can stack and CE switch (practical limit is the space to stack, length of wiring and real use for that many FW versions). Using a 48 step rotaryswitch and stacking 47 Flashchips (1x47 for NOR / 2x 1x47 for NAND) parallel to the original one, its even possible to make a 48-boot system (just remember you have to have a seperate harddrive for every selected flash firmware version).
Dual-Banking
This method relies on the fact that SYSCON has 2 EEPROM banks, and a "recovery mode" flag that can be set to load a recovery firmware located in the ros0 region of the flash.
By pulling the backup_mode pin low or high, you can aparently switch eeprom banks in the SYSCON EEPROM. In the second bank, you would have the recovery mode flag set, thus loading firmware from the ros0 region on flash.
Increased size NOR Flash
This method relies on entirely lifting the existing NOR flash chip and planting a 256mbit chip, you could lift Address pin 23 and have a switch to tie this low or high to switch banks. A compatable samsung k8p5615uqa chip (datasheet)
This looks like it could work, as per the spansion and samsung charts, when using autoselect commands etc, it does not care about the state of pin 23. So there should not be any interference.
Notes:
128mbit and 256mbit chips don't have the same ProductID.
This ID can easily checked by SONY to avoid the principle even if the VendorID is the same.
VendorID = Unique manufacturer ID
ProductID = Unique device ID
ie. :
SPANSION S29GL128P - VendorID = 0x01 & ProductID = 0x7E 0x21 0x01
SPANSION S29GL256P - VendorID = 0x01 & ProductID = 0x7E 0x22 0x01
Limitations
Firmware hash checks
Firmware hash checks are located on SYSCON EEPROM, aparently these checks are run within Indi info manager on LV1. These compare the hashes stored in syscon with the files stored on flash. If the checks fail, the console does not boot (RLOD). We could get around this by using dual-banking on SYSCON or by patching the checks out.
VFlash
Only a single version of VFlash is stored on flash in NAND consoles, and a single copy is stored at the beginning of the PS3 hard drive on NOR consoles. Because the firmware stored here doesn't match that stored on flash, you would have to reinstall the rest of firmware everytime you switch. We could possibly overcome this limitation by patching the storage manager to redirect vflash to another region of the hard disk.
Software based
Using graf_chokolo's payload
In graf_chokolo payloads, there is a payload that can be used to load an alternative lv2_kernel.self
You have to save the alternative lv2_kernel.self on flash and use the payload to make lv1 load it.
Quoting graf_chokolo
Guys and be careful with store_file_on_flash.c and replace_lv2.c payloads.
With store_file_on_flash.c i’m able to store a new file on FLASH memory where CORE OS files are stored from PUP.
If you do not know what that means then don’t play with this, it could brick your PS3, but it’s safe to use when you know what you do.
With both of those payloads i’m able to boot a patched lv2_kernel.self from FLASH without flashing PUP, i just store a second lv2_lernel.self
on FLASH, then patch System Manager in HV which is reponsible for booting GameOS and boot custom LV2 kernel from 3.41.
You don’t need NOR flasher if something goes wrong:
just reboot HV and your original lv2_kernel.self will be booted again

The same way you could boot lv2_kernel.self from dev_flash.
Just patch path to lv2_kernel.self in System Manager and point it to lv2_kernel.self stored on dev_flash
Limitations
- Same as above and this could ONLY be used with a lv2_kernel.self compatible with you actual lv1.self
- You can only customize lv2_kernel.self and below
Bootloader
There is master hardware based different for every PS3. It is said that some have managed to get ahold of it. Being able to sign in a higher privilege would give us the ability to create a bootloader that would allow us to load any firmware previously patching it.
This would be the best solution, having a bootmii like bootloader with recovery options, but it is also the most farfetched.
Manual dualboot 3.55 & 4.x with 2 flashdumps and 2 harddrives
(old longer guide is on talkpage)
Preparation in short
Getting original and downgrade to 3.55
- Dump the flash and make sure it is useable for downgrade to 3.55
- Patch it for downgrade
- Reinstall (Factory Service Mode) the prepatched PUP (e.g. Rogero V3.7 (mirror / MD5:8f8166b25d6bed891f292c77de5c4b28)
for noFSM, use 9.99 downgrader instead: MD5:b67747f529d047d63151786544a58b50 ) and reboot (normal mode) to make sure it works fine
- Redump the flash to make sure it has filled both ROS0 and ROS1 (they will differ as one will be the prepatched from the previous step, while the other will contain CoreOS from the installed PUP) and keep this as '3.55-swap.bin' together with the used harddrive '3.55.HDD'.
Getting latest
- Update (normal or recovery mode) to the latest firmware you want to use (e.g. 4.x) and reboot (normal mode) to make sure it works fine
- Dump the flash and keep this as '4.x-swap.bin' together with used different harddrive '4.x.HDD'.
Swapping
When you want to boot to 3.55
- Reflash '3.55-swap.bin' and insert harddrive '3.55.HDD'.
When you want to boot to 4.x
- Reflash '4.x-swap.bin' and insert harddrive '4.x.HDD'.
Swap Solutions
Solutions for swapping/connecting the flash
NAND
Ghetto rigs
TSOP Clip/Probe
TSOP sockets
- http://www.primedistributing.com/Enplas_OTS_Series_PDC_p/ots-series-pdc.htm
- https://www.emulation.com/cgi-cfm/insert_quantity.cfm?part_number=S-TSO-SM-048-A%2C%2048-TSO1
- https://www.emulation.com/cgi-cfm/insert_quantity.cfm?part_number=S-TSO-SM-048-A1%2C
- http://www.ebay.com/itm/TSOP48-to-DIP-48-Pin-IC-socket-Adapter-Converter-B-m-/320660655179
Adaptors
NOR
TSOP Clip/Probe
TSOP sockets
Solutions for swapping / externalise the harddrive
Internal tray with eSATA connector
Xecuter HDD Xtender - nothing special there, just a means to externalise the SATA port and securing it inside the HDD tray
ezflash ps3slim hdd expander - nothing special there, just a means to externalise the SATA port and securing it inside the HDD tray - Notice the false claims of 16TB and SATA300 (the ps3 maximum supports 1TB / SATA-I/150)
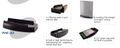
3-in-1 PS3 HD PLUS PHE-02 - pic1

3-in-1 PS3 HD PLUS PHE-02 - pic2


- http://www.ezflash.cn/ps3-hdd-expander/ (ps3 slim)
- http://www.joystiq.com/2009/02/03/mysterious-ps3-esata-adapter-promises-massive-hdd-storage/ (ps3 fat)
- http://www.destructoid.com/adding-300gb-esata-to-a-ps3-in-pictures-30024.phtml (ps3 fat)
External cradle with SATA uplink
Remember: You still need an eSATA (cradle) to SATA (PS3) cable
- http://www.dealextreme.com/p/all-in-1-dual-hdd-docking-station-with-one-touch-backup-for-2-5-3-5-sata-hdd-71509?item=18
- http://www.dealextreme.com/p/all-in-1-dual-hdd-docking-station-with-one-touch-backup-for-2-5-3-5-sata-hdd-31574?item=10
DIY / cheap solutions
Alot of the above mentioned solutions can be made DIY.
- http://www.aliexpress.com/fm-store/601043/210118527-417040433/SATA-7-pin-Male-to-ESATA-Female-cable-30cm-for-ps3.html (only US $5.99 !)
- http://www.amazon.com/eSATA-Female-Extension-Cable-Bracket/dp/B00IU8Y9AG
- http://maxict.nl/product/3507535/delock-82855-cable-sata-extension-serial-ata-verl-ngerungskabel-serial-ata-150-300-600-serial-ata-7-polig
SATA Switches
Switching SATA harddrives:
- http://jivebay.com/2008/12/08/sata-switches-hdd-hard-disk-drive-selectors-part-6/
- http://www.cooldrives.com/4posaiisw3ba.html
RAID enclosures with eSATA port
they must serve the storage as uniform storage device on a single port (not software RAID, relying on host)
Not useable devices
Devices that state that host must support Port Multiplier (PM) specifications won't work, e.g.
Publications based on this article page
- PS3 Dual-Firmware – Hardware Hacking Guide – Ed. 2 - Author: No_One - PS3_Ed2_dualnand.pdf // (mirror: PS3_Ed2_dualnand.pdf (128 KB))
| ||||||||||||||||||||||||||||||||||||||